
In Today’s git learning tutorial we will explain about git and it’s setup and how you can use it in your project to make your work smooth and easy.
What is git?
Git is a version control and code management system. With this tool developer can speed up their development.
Git is a free software to use , however they have paid plans as well.
How to Setup Git in Linux System?
First you need to run below command
sudo apt-get update
and Now run below command.
sudo apt-get install git
How to check the git version?
Run below code to check the git verision
git –version
Git Branch
Branches are a part of your development process and it is a pointer to a snapshot of your changes. Git Workflow
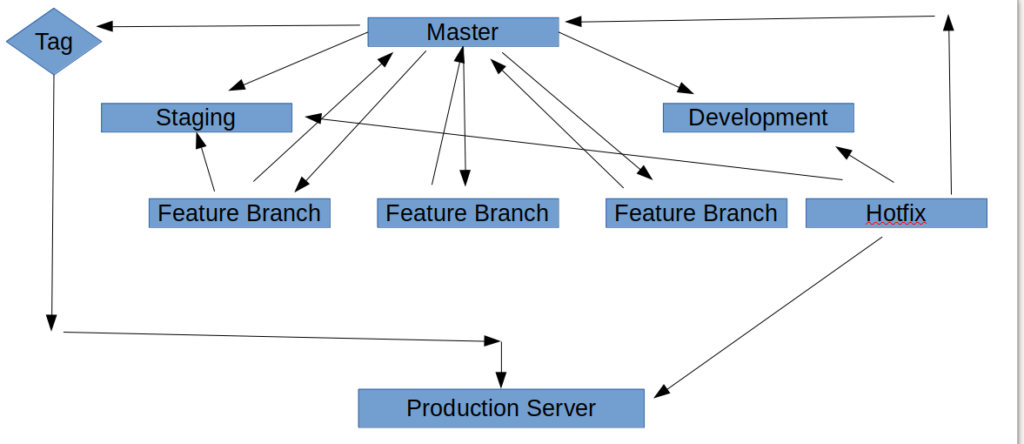
As you can see in above screenshot. The main branch is Master , This is the branch where we merge our final changes which will go to production. Then you can see Staging and Development Branches
This is the branch which you will link to your staging and development server. At last you can see feature branch, this is your daily working branch where you will do your development. So when you finish
your work in feature branch , you should create Pull Request with development , staging and master branch. First you will merge your Pull Request with Development Branch and deployment your changes
in Development instance and If all your task is working well then you will merge your Pull Request with Staging Branch and deployment your changes on staging instance , Once it is confirmed by QA or client that
all changes are working as expected. Then finally you will merge your master branch Pull Request. Now Here you should not take checkout and pull directly of master branch in your production server , You can see in above screenshot
that I have linked master to Tag. Now you are thinking that what is Tag, Don’t worry I will cover that also in our today’s topic. For now just understand that you need to create tag from master branch and deploy tag on production instance.
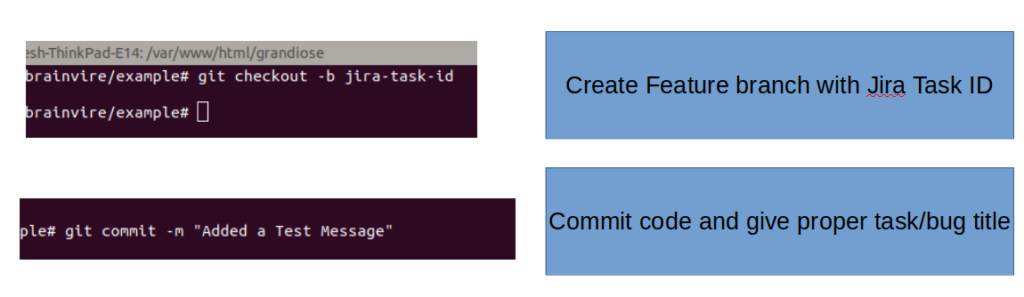
How to create feature branch and Commit changes?
Check below screenshot to create feature branch and commit your changes
What is Tag?
I believe you heard about the software versions like 1.0.0 , 1.0.1 etc. So in simple language Tag is same , where you are definding a meaningful name and it’s version. So it makes your rollback easy and maintain release notes of your changes for
every new deployment. For example you have deployed initial project on production server with version 1.0.0 , then you made some changes in your project and wants to deploy on production , So you need to merge your changes with master and then
create tag like 1.0.1 and take checkout of this tag on your production server , Now suppose in your new tag there is an issue and you want to immediately rollback your changes , So here if you take checkout and pull of your master branch then it is very hard
to rollback as you need to remove all your changes and commit and again deploy. But with tag you just need to take previous version tag checkout that’s it. Isn’t it so simple.
First of all you need to take checkout of master branch in your local and take latest pull
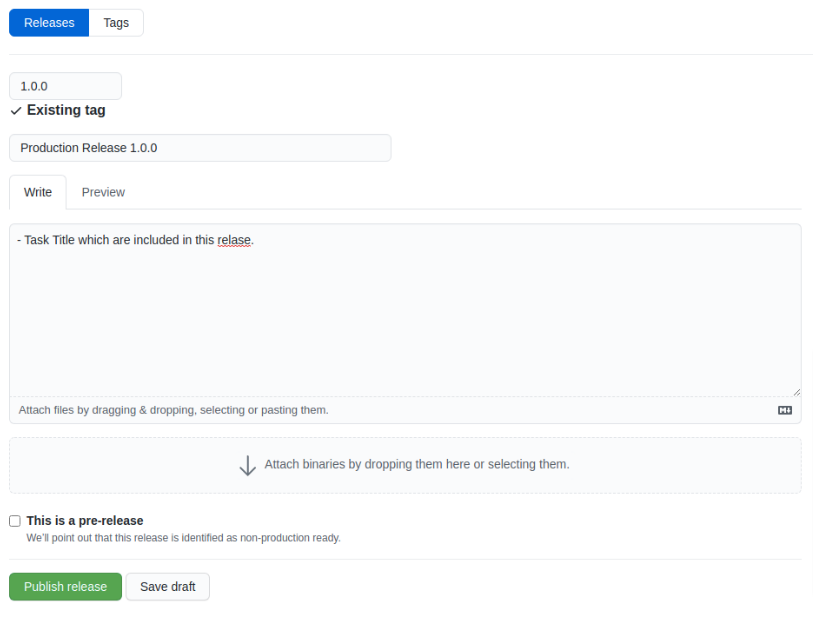
You need to run below command to create and push tag
git tag -a 1.0.1 -m “new changes”
git push –tags
and check below screenshot to manage release note.
Visit us again
What related topic How to undo git command