Hello Friends, Today in this topic we will understand about that in git how to create a branch.
If you are a developer and building a software or website then this topic is for you.
Git is very powerful tool, which is widely used in software industry to manage the source code and automatic deployment of source code to server. One of the key feature in git is ability to create branch. So we will understand today that, In git How to create a branch, because of this branch feature multiple developers can work on same project at same time.
If you are new to git and want to know what is git and installation steps then you can visit our Git Tutorial blog.
What is a Branch in git?
Branch plays a very important role in git to maintain different versions of code that can be modified independently at same time and multiple developers can work at same time. This allows developers to work on features or bug fixes without affecting the main codebase, So if anything goes wrong so issue will be at that branch only and original codebase will not affect. So when developer done with changes and tested then he can merge his branch with main codebase.
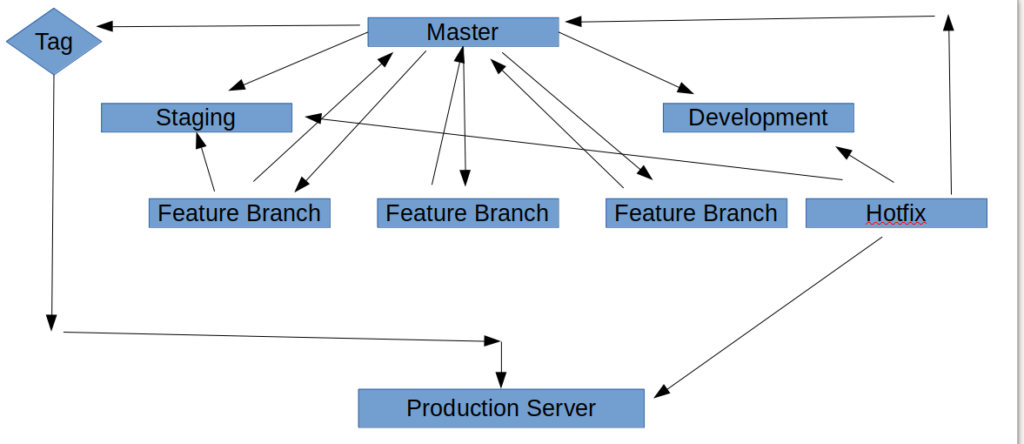
In Above Picture, you can see, there is master branch which is an original branch and used for production deployment, and after that you can see I have created staging branch , development branch and also I created multiple feature branch. Let’s understand each branch
Master Branch : It is used for Production Deployment. So you can create a tag from master branch in git and deploy on production
Staging Branch : If you are building a website then you might need to have 1 UAT instance where your client can verify that all features are working fine before going to production. So you can create a staging branch in git and deploy that branch on UAT server.
Development Branch : When multiple developers are working on same project, It is important to do a integration testing, where you make sure that your website is working fine without any conflicts if multiple developers are deploying their code, So you should have 1 development server for integration testing. and deploy development branch there.
Feature Branch : This is the branch where your developer work on their project feature. So you can either create feature branch from master branch, or staging branch or development branch as per your workflow , But my recommendation will be that you should create feature branch from master branch in git.
Ways in git How to create a branch?
There are various ways, you can create branch in git.
Create Branch Terminal
Step 1: Open your terminal and go to project directory.
Step 2: Run git branch and make sure you are at master branch

If you are not at master branch then you can run git checkout master command.
Step 3: Now run below command to create new branch
$ git branch <new-feature-branch>

Here you can see my new branch has been created but I am still at master branch. If you want to switch to new feature branch then you can use git checkout branch and also alternative way is to create branch is as below
$ git checkout -b <new-feature-branch>

Here if you will see , with this command I have created new feature branch along with switch to my new feature branch.
Now in this branch you can work and commit your changes and push it to git.
Create branch in github
Earlier I showed you, how to create branch via terminal. Now we will see how you can create branch in github.
Step 1: Login to your github account
Step 2 : Go to your git repository
Step 3 : Create branch from master branch as shown below
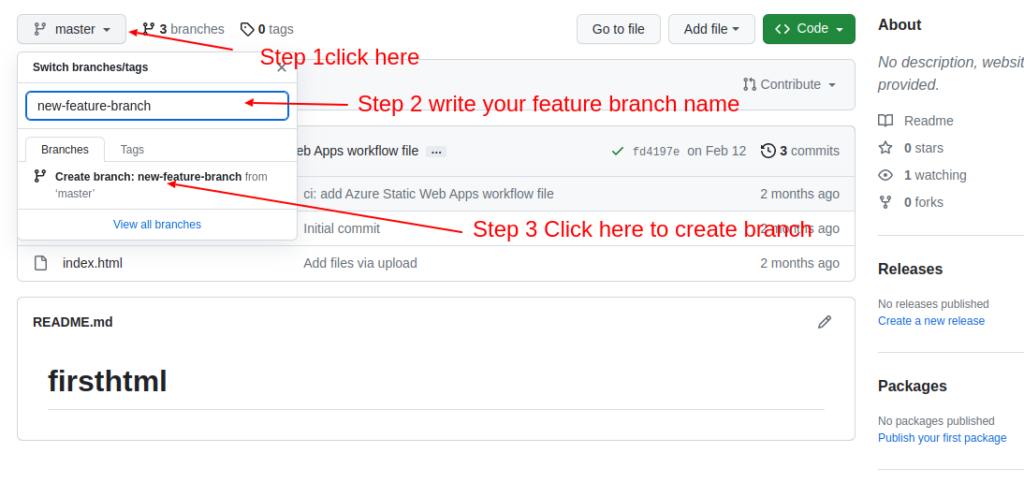
After above steps you will see your new feature branch in github, now you can take checkout of this branch and start working.
How to create new branch in VS Code
Now we will understand how you can create feature branch using VS Code, VS Code comes with built-in git integration. If you are not familiar with command line then don’t worry, with VS Code you can easily create and manage git branches , we will show you step by step how you can do it.
Step 1: Open your VS Code
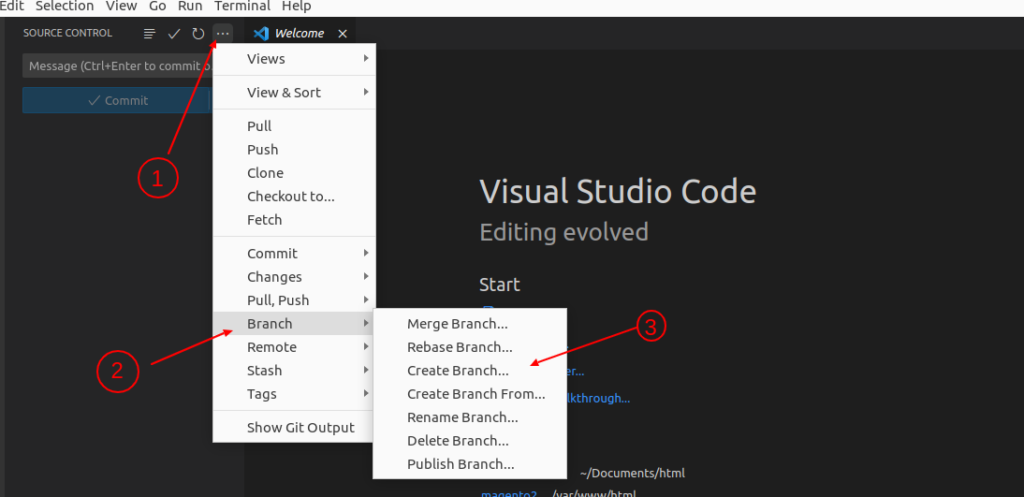
Step 2 : Open the Source Control panel by clicking on the Source Control icon on the left-hand side of the screen
Step 3 : Authenticate your git account with VS Code git plugin
Step 4 : Click on 3 dots as show below and go to Branch Menu > create branch
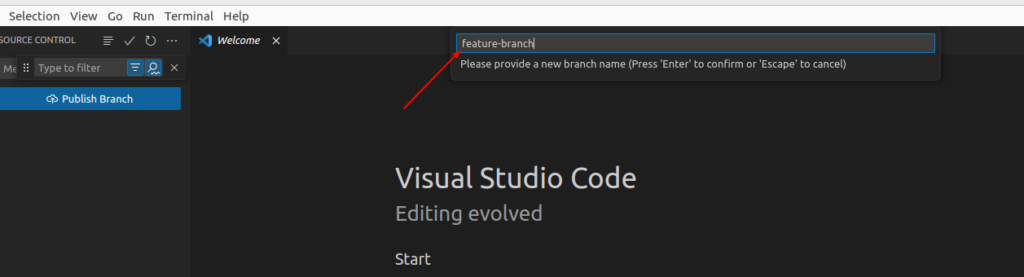
Now write feature branch name and press enter.
Conclusion
Creating a branch in git is a very powerful and important steps to work with multiple tasks and bugs without affecting main codebase. By following above steps It is very easy to create branch in git. and there are various ways to create branch in git as I explained some of them in this blog post. So hope you are now familiar in git how to create a branch and you can start work on it with confidence. Make sure to test your task before merging your feature branch with master branch to keep your code neat and clean.
Happy Coding and Visit us again. Share this blog post with your friends.
If you have queries realed to this topic or github , please write in a comment box , we will try to solve it.